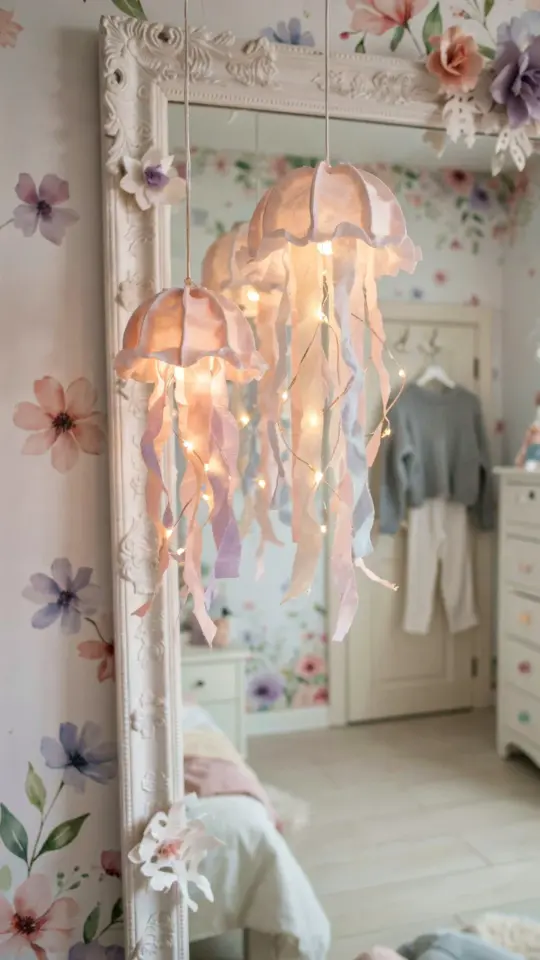
I have a confession: I am a little obsessed with soft, glowing lights that make a room feel like a dream. And when I saw the trend of jellyfish lights floating through dorm rooms and bedroom corners this past year, I knew I had to try making one myself. The best part? You can create a beautiful DIYPaperJellyfish light with just a few supplies from the craft store, no special skills required. It is the kind of project that looks complicated but is actually simple enough for a lazy Sunday afternoon.
Whether you are sprucing up a college apartment or adding some whimsy to a kid’s room, this tutorial will walk you through every step. Think of it as a crafty mix of ocean vibes and cozy lighting, perfect for the darker months when you want a little magic indoors.
Why Make a DIY Paper Jellyfish Light This Season?
This is not just any paper craft. Right now, the “glow vibe” trend is huge in home decor. People are moving away from harsh overhead lights and toward soft, organic shapes that feel alive. A tissue paper jellyfish with tiny fairy lights fits that mood perfectly. It gives you a gentle glow without being distracting, and it adds movement to a static room.
Plus, it is an affordable alternative to buying a pricey designer lamp. Most of the materials cost under $10, and you can customize the colors to match your existing decor. I have seen versions in pastel pink, ocean blue, and even metallic gold for holiday parties. The process is also forgiving, so if you mess up a tentacle, you can just trim and try again.
Materials You Will Need for This Paper Craft
Before you start, gather everything in one place. Here is the short list of supplies that worked best for me:
- One sheet of tissue paper (20×30 inches or similar) in your chosen color. Translucent white or pale blue gives the best glow.
- A pair of sharp scissors. Dull scissors will tear the tissue paper.
- Clear fishing line or thin thread for hanging.
- A strand of battery-operated fairy lights (around 6 to 10 feet long). Look for ones with a warm white setting.
- Craft glue or a glue stick. Avoid liquid glue as it can bleed through the paper.
- Optional: a paper lantern frame (the cheap collapsible kind) to give the jellyfish head more structure.
I also recommend using a clean, flat surface like a kitchen table. Tissue paper is delicate, so having room to spread out helps prevent accidental rips.
Step by Step: How to Build the Jellyfish Body
Start by cutting your tissue paper into a large circle. A good size is about 18 inches in diameter, but you can go bigger for a dramatic look. Fold the circle in half, then in half again, and then in half one more time. You should have a small wedge. With scissors, round off the pointed tip so that when you unfold it, you have a smooth dome shape.
Now make the tentacles. Cut long strips of tissue paper about 1 inch wide and 12 to 18 inches long. You will need at least eight to ten strips. Gently stretch each strip lengthwise to soften the fibers, which makes them curl slightly when they hang. Attach the strips to the inner edge of the dome using a small dot of glue. Space them evenly around the circumference.
If you want a fuller look, add a second layer of shorter strips inside the first layer. This gives the jellyfish a more natural, layered silhouette. Let the glue dry completely before moving to the next step. While you wait, you can prep the fairy lights.
Adding Fairy Lights for a Soft Glow
Here is where the JellyfishLight really comes alive. Take your fairy light strand and arrange the bulbs in a loose cluster. You want the lights to sit inside the tissue paper dome, not poke through. If your lights have a large battery pack, you can tuck it into the dome or tape it to the top where it will be hidden by the paper.
Carefully thread the light strand through the top opening of the jellyfish head. Spread the bulbs evenly so no spot is too bright. Then gather the edges of the tissue paper dome around the light cluster and cinch them together. Secure the paper with a small piece of tape or a glue dot. The result should look like a soft, glowing bell.
For a more polished look, you can insert the lights into a small paper lantern first, then cover the lantern with the tissue paper. That gives the head a rounder shape and prevents the bulbs from shifting. Either way, test the lights before sealing everything up, just in case a bulb is loose.
Hanging and Display Tips for Your Room Decor
Now you have a floating jellyfish. But how do you hang it without it looking like a science project? Use clear fishing line tied to a small loop at the top of the jellyfish head (you can create a tiny hole and thread the line through). Attach the other end to a ceiling hook, a curtain rod, or even a sturdy branch indoors.
For RoomDecor that feels intentional, hang the jellyfish
#DIYPaperJellyfish #PaperCrafts #RoomDecor #JellyfishLight #DIYTutorial
Leave a Comment