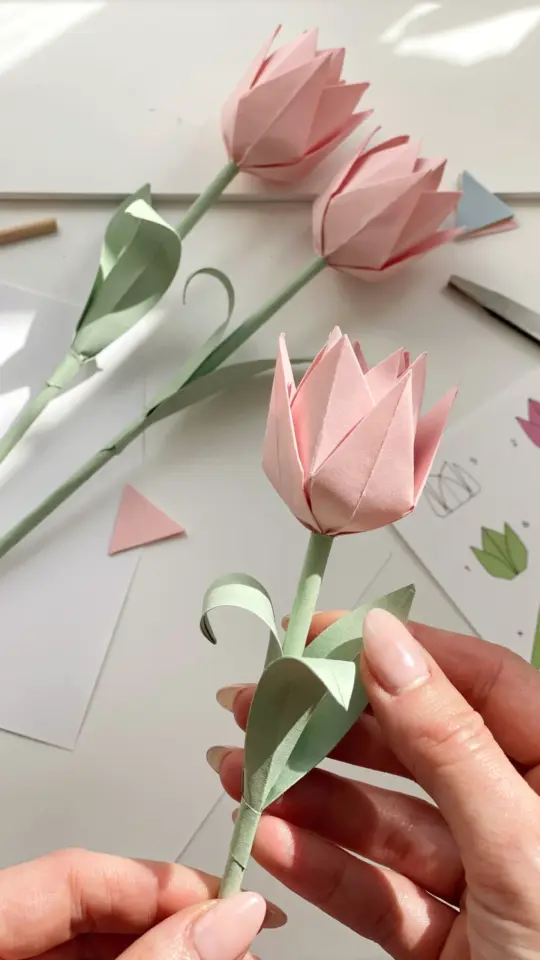
Learning to fold an origami tulip is one of the most satisfying spring crafts you can try, especially when you are working with a tight budget. A single square of paper transforms into a cheerful bloom that costs almost nothing, yet looks thoughtful and fresh. This easy origami tutorial will guide you through each fold, using supplies you probably already have at home. No special tools, no expensive kits, just paper and a few minutes of your time.
Why Origami Tulips Are Perfect for Budget Spring Decor
Spring decorations can get pricey fast, but paper flowers offer a clever alternative. An origami tulip uses one piece of paper, and you can color coordinate them with your existing decor for free. I have made entire centerpieces for a spring brunch using old notebook paper and recycled gift wrap. The best part is that these tulips last forever. They never wilt, need no water, and you can store them flat for next year. If you are looking for a low cost way to brighten a room, this project is ideal.
Another budget friendly bonus is that origami is forgiving. If you mess up a fold, you can reuse the paper for a smaller flower or for practice folds. You are not wasting expensive materials. This makes it a great craft for kids or for anyone who feels nervous about trying something new.
Choosing the Right Paper for Your Origami Tulip
Traditional origami paper works well, but you do not need to buy a special pack. For a budget conscious project, I often reach for scrap paper from old magazines, pages from a discarded book, or even wrapping paper that is left over from gifts. The key is that the paper should be square and not too thick. A standard 15 cm x 15 cm square is perfect, but you can go bigger or smaller as long as it is a perfect square.
If you use printer paper, cut it into a square and then fold a crease well. Printer paper is a bit thicker than origami paper, so your tulip will hold its shape nicely. For a softer look, try tissue paper or even a clean paper napkin. Just be careful because thin paper tears more easily. My personal favorite is pages from a colorful catalog because the printed images create unexpected patterns on the petals.
Step by Step How to Fold an Origami Tulip
This method creates a classic tulip with a hollow center. I will explain it in clear, simple steps. Take your square paper and place it with the colored side facing up if you have one. If your paper is plain, that works too.
- Fold the paper in half diagonally to form a triangle. Crease well and unfold.
- Fold it in half diagonally the other way. Crease and unfold. Now you have an X shaped crease.
- Flip the paper over. Fold it in half horizontally and vertically, making a plus sign crease. Unfold each time.
- Pinch the four corners together so the paper collapses into a smaller square. This is called a square base. Press the folds flat.
- With the open end of the square facing downward, fold the top right layer to the center crease. Repeat on the left side.
- Flip the model over and repeat the same folds on the back side. You should have a shape that looks like a kite with two flaps on each side.
- Fold the right flap to the center again. Then fold the left flap to the center. Repeat on the back side.
- Now you have a narrow diamond shape. Gently pull the four petals outward from the bottom opening. Use your finger to puff up the center.
- Twist the bottom tip slightly to create a small hole for the stem. Your tulip is finished.
If your paper is stubborn, use a bone folder or the back of a spoon to sharpen the creases. Sharp creases make the final flower hold its shape better.
Making the Stem and Leaf Without Extra Supplies
A paper tulip looks even more realistic with a stem, and you can make one without buying anything. Roll a piece of green paper or a strip from a magazine into a tight tube. Use a dab of glue or a piece of tape to secure the end. If you have a green plastic drinking straw, that works perfectly and costs nothing if you reuse one from a takeout drink.
For the leaf, cut a small rectangle of green paper about 10 cm long and 3 cm wide. Fold it in half lengthwise, then cut a gentle curve from the fold to the open edge to create an elongated leaf shape. Unfold it and slightly curl the edges with your finger. Slide the leaf onto the stem and push it up to the
#origamitulip #paperflowers #origamitutorial #diycrafts #springcraft
Leave a Comment