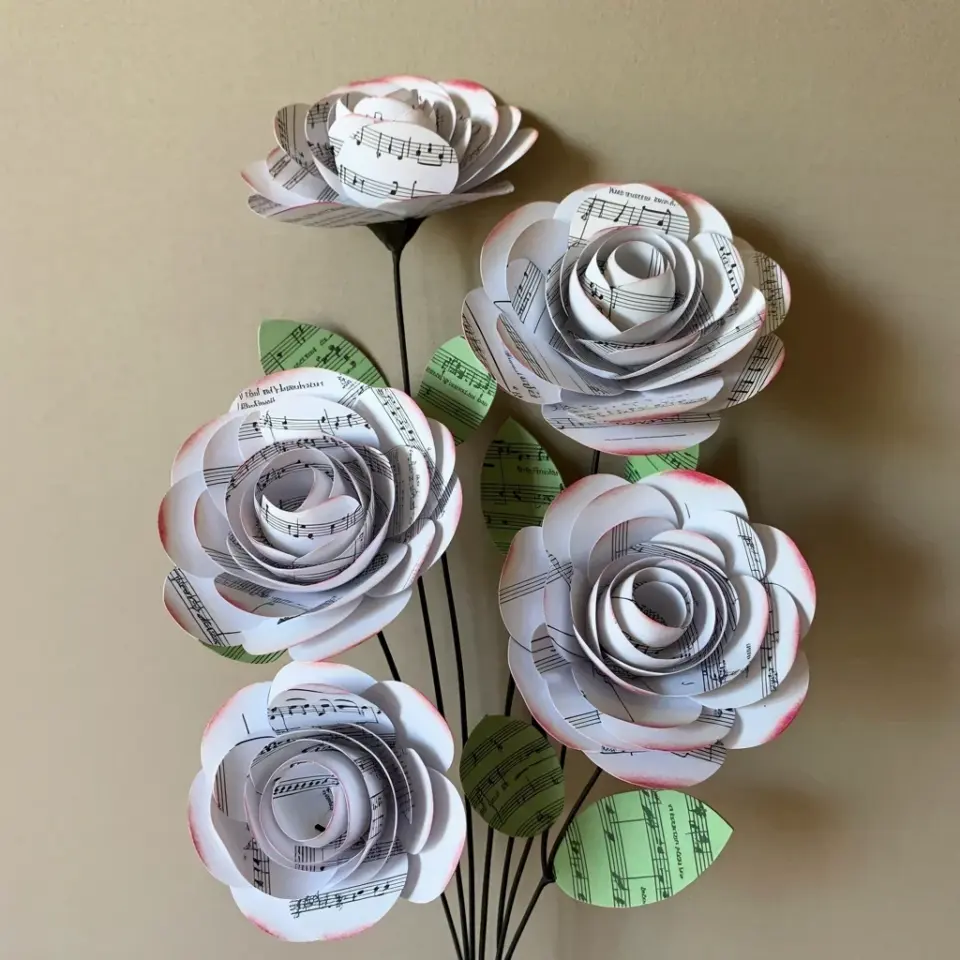
Tucked between yesterday’s grocery list and a stack of unpaid bills, there’s a little pile of scrap paper that doesn’t look like much. But that’s the magic of this DIY Valentines gift; you can turn those random scraps into something that genuinely looks like a florist arranged it. I’m talking old notebook pages, sticky Post-it notes (yes, really), and the cardboard tube from the last toilet roll. It sounds a bit mad, I know. But stick with me because the before and after is honestly a bit ridiculous.
I had a lazy Sunday afternoon and a weird urge to make something that didn’t involve a screen. Look, I’ve bought expensive bouquets before, but they just wilt and end up in the compost. This rose bouquet, though? It lasts forever, costs almost nothing, and carries a little more weight because you made it yourself.
—
Why You Should Try a Recycled Paper Craft for Valentine’s Day
Valentine’s Day has a way of turning into a spending competition, and honestly, it can feel a bit soulless. Making a handmade gift flips the script, giving you a chance to sit down, slow down, and create something from scratch. This is a proper eco friendly craft, not just because you’re using recycled rolls, but because you’re giving a gift that isn’t wrapped in plastic or shipped across the world. It’s nice to know your gift is kind to the planet, honestly, especially when everything else in February feels so commercial.
This specific project is also stupidly forgiving. There are no perfect angles, no weird measurements, and no way to really mess it up. It’s the perfect project for a rainy afternoon, and it’s so easy to do while half-watching a movie. You just need a bit of patience and a willingness to roll up some paper. Plus, the sheer shock on your partner’s face when they realize those fragile little paper bits are actually roses is worth the effort alone.
—
Gathering Your Scrap Paper and Toilet Roll Supplies
Ok so, before you start, let’s do a quick sweep of your house. I am a notorious hoarder of things that *might* be useful one day, and this is the project that finally justified that. For this to work, you want paper that isn’t too thick or glossy. You know, the stuff you can easily crumple without getting a hand cramp.
Here’s your scavenger hunt list:
– **Old sheet music or book pages:** These add a lovely vintage, romantic vibe. They look ten times better than plain white printer paper.
– **Your colorful Post-its:** The classic yellow works, but pink, red, or even pastel blue sticky notes make the roses look more dynamic and floral.
– **Empty toilet roll tubes:** You’ll need one per stem, so maybe save up a few over the week. (Egg cartons or cardboard boxes, cut into strips, also work if you’re in a pinch).
– **Scissors, a glue stick, and some string:** I used standard PVA glue, but honestly, any glue that dries clear and holds tight is fine.
I remember one time I used an old math exam I failed to make a rose stem. It felt weirdly therapeutic. It’s a nice way to give old, forgotten paper a second life. If you’re a bit of a sentimental hoarder like me, this is your chance to use those cute little notes from a trip or a ticket stub from a great concert. The story behind the paper just adds another layer to the whole gift.
—
How to Make a Post-it Note Rose (The Main Bloom)
This is the core of the whole operation, the part that looks complicated but is actually just a bunch of simple folds.
Start with two Post-it notes for one full rose. Take one note and fold it in half diagonally to make a triangle. Then, fold it in half again to make a smaller triangle. Now, here’s the trick, you want to cut this into a petal shape; just round off the top corners with your scissors while the note is still folded. When you unfold it, you’ll have a lovely little 3D flower shape with a hole in the middle, though it will look a bit flat and sad at this stage. Don’t worry, that’s normal.
Repeat this with the second Post-it note. Layer them on top of each other, offsetting the petals slightly so they don’t line up perfectly, like a real rose. Push a small hole through the center and poke a toothpick or a stripped down twig through to hold them together. Fluff the layers up a little, curl the innermost petals inward, and you’ve got a miniature decorative rose that looks surprisingly intricate. It’s a bit fiddly, but it’s one of those little jobs you can just lose yourself in for an hour, especially if you’ve got a podcast on in the background.
—
The Trick to Shaping a Realistic Paper Rose from Scrap Paper
Right, so the Post-it roses are cute, but if you want roses that make people do a double-take, you need a different technique. Grab a larger piece of paper, like a page from a book or a sheet of music. Draw a rough spiral on the paper, starting from the outside edge and swirling inward about 3 to 4 centimeters thick. It doesn’t need to be perfect; a wobbly line actually creates a more organic, natural-looking petal edge.
Cut along the spiral line, and then begin rolling the paper from the outside edge (the start of the spiral) toward the center. Hold the base tightly and keep rolling. Here’s the little secret: when you get to the end, let the center of the spiral stick up slightly higher than the outer edges. This creates that gorgeous, natural-looking interior curl that makes a paper rose look almost indistinguishable from a real one. Once it’s rolled, release the tension slightly and let it fluff out, then glue the bottom tail firmly to the base.
This particular technique is a game changer. It’s the difference between a ‘kind of looks like a rose if you squint’ situation and a ‘wait, that’s paper?’ moment. I’ve made dozens of these, and the imperfections are what sell it. No two spirals are ever the same, so each bloom has its own little personality.
—
Using Toilet Rolls to Make the Rose Stems
This is where the humble toilet roll becomes a hero. Plain green florist wire is expensive and often gets thrown away, plus it’s not exactly eco friendly. But a cardboard tube? That’s sturdy, free, and recyclable. Take your recycled toilet roll and cut it into thin strips, around 1.5 to 2 centimeters wide. Unroll these strips; they’ll naturally want to curl up, which is actually perfect.
Take one of these strips and cut it gently down the middle, leaving about an inch uncut at the top. You want to create a little fringe. Then, just roll the uncut end tightly around the base of your paper rose and secure it with glue. The fringed bits act like the little green sepals you see at the back of real roses, which is the perfect touch for making it look alive.
Once attached, you can paint the entire cardboard tube green with some acrylic paint or just wrap it in a strip of green washi tape. I’m lazy, so I usually just wrap green yarn around it to give the stem a nice, cozy texture. It gives the craft a super rustic, handmade feel. If you want to make a bigger bouquet, just make more stems and then tie them together with a ribbon. They honestly hold their shape much better than real stems, and you can bend them slightly to create a more natural, flowing shape.
—
Assembling and Gift-Wrapping Your Handmade Valentine’s Bouquet
Here’s where you get to have a bit of fun with the presentation. Use a piece of brown packing paper, or some old newspaper, to wrap the stems in a cone shape. Lay one stem down, add another at a slight angle, and keep building. Cover the bases with a pretty ribbon.
I always write a little note on the paper cone itself, something like “Guaranteed not to wilt,” just to be a bit goofy. That personalization is what really makes it a Valentines day idea with heart. Honestly, the wrapping can make or break the initial impression. You want them to think you’ve actually spent money at a boutique, not that you just raided the recycling bin (even though you did).
One final tip: spray the paper rose petals with a bit of perfume or essential oil. It adds a whole sensory element to the gift, and it’s a little detail that shows you truly went the extra mile. Adding a sprig of dried lavender from an old potpourri bag works wonders, too.
—
At the end of it, you’re left with a bouquet that’s imperfectly perfect, and that’s the whole point. This entire project only costs you a bit of time and a few scraps that were destined for the bin. It’s a cool little reminder that you don’t need a ton of money to show someone you care. You just need a little bit of effort and perhaps an unhealthy amount of Post-it notes lying around.
Go on, give it a try. I promise you’ll be smug about the results. 🌹
Leave a Comment