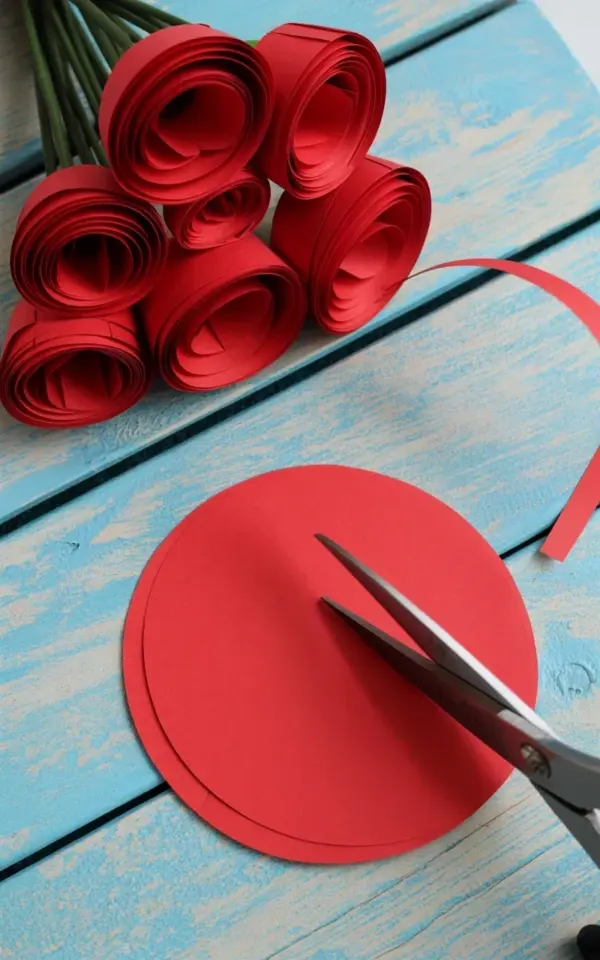
That photo of red roses on pale blue wood has been living in my head since I first saw it. You know the one: the bouquet looks almost too perfect, but then you notice the scissors mid-cut and a single circle of red paper waiting to become something. That’s the whole trick. These spiral paper roses are nowhere near as fiddly as they look, and honestly, the process is almost meditative once you find your rhythm.
If you’re here hoping to learn how to make a red origami rose from scratch, you’re in the right place. The best part? You don’t need a dozen specialty tools or a craft room with perfect lighting. Just some paper, a pair of scissors, and about ten minutes of your afternoon.
What You Actually Need to Make Paper Roses
Let’s talk supplies, because I have opinions about this. You do not need to buy a special kit. I’ve made these with everything from dollar-store cardstock to the good stuff, and the cheap paper works just fine.
- Paper: Red construction paper or medium-weight cardstock. Something that holds a fold but isn’t so thick your hands cramp.
- Scissors: Any sharp pair. The silver scissors in that photo? Totally fine.
- Glue: A glue stick works, but hot glue is faster if you’re making a whole bouquet.
- Optional: A wooden skewer or toothpick to help curl the petals.
One thing that actually matters: if your paper has a white back, like most construction paper does, you’ll want to think about which side faces up when you start folding the spiral. The back will peek through in places, and that’s fine. It adds depth, actually.
I once tried making these with wrapping paper. Cute idea, terrible execution. It tore about three times before I gave up and dug out the cardstock.
How to Cut the Perfect Spiral Circle for Origami Roses
Grab a circular object, a bowl, a plate, a jar lid, whatever you have, and trace it onto your paper. You want your circle to be somewhere between three and four inches wide for a good-sized rose. Too small and the petals get cramped and hard to twist. Too big and the rose looks floppy and loose at the center.
Now you’re going to cut a spiral. Start at the outside edge and work your way toward the center, like you’re peeling the skin of an apple in one long strip. Keep the width fairly even, pencil-thick or slightly wider. It does not need to be perfect. In fact, imperfect strips make for more organic, realistic roses.
Here’s the thing, nobody’s going to inspect your spiral from the inside of a finished flower. Stop obsessing over the cut lines and just get to it. When you reach the middle, leave a little round disc, about the size of a dime. That’s your base, your anchor for the whole flower.
Optional But Fun: Adding Wavy Edges for a Realistic Paper Flower
Before you start rolling, decide what kind of rose you’re going for. A flat, smooth spiral gives you a tidy, almost origami-looking flower. That’s the classic red origami rose look, and it’s what most people are picturing.
But if you want something a bit more wild, grab your scissors and cut a wavy or scalloped edge along the entire outside of your paper circle before you cut the spiral. When you roll it, those waves turn into ruffled, irregular petals. It takes the craft from cute to surprisingly realistic.
I like to do a mix of both in one bouquet. The contrast makes the whole arrangement look more intentional, like you actually knew what you were doing instead of just winging it. (I was winging it, but nobody needs to know that.)
Step-by-Step: Rolling Your Red Origami Rose
Okay, here’s the actual making part. It’s easy, but you need to read the instructions first or you’ll end up with a cone instead of a flower.
Take the outer tail of your spiral, the one with the wavy edge, and start rolling it toward the center. You want to roll it tightly at first, that’s the heart of the rose. Don’t glue this first part just yet. You need your fingers free to control the tension.
As you move past the first couple of rotations, start letting the spiral angle outward slightly. This creates the flare of the petals. Think of it like rolling a slightly lopsided cinnamon bun. You want the bottom edges to stay mostly aligned while the top edges spread apart.
When you reach the central disc, flip the whole thing over. You’ll see the flat bottom, with the tail of the spiral ending in that dime-sized circle. Put a dab of glue right in the center of that disc and press down. Hold it for about fifteen seconds, not gonna lie, my thumb gets tired, and you’re done.
One Weird Trick to Make the Spiral Look Better
Here’s a little secret the tutorials don’t mention. When you roll the spiral, you want the paper to curl downward as you go. Use your thumb to gently pull each layer down toward your palm while you roll.
That downward motion is what gives the petals their soft, natural cup shape. If you skip it, your rose looks like a cardboard tube that gave up. It’s a subtle difference, but it’s the difference between a flat craft project and something you’d actually put in a vase. Try both ways and you’ll see what I mean.
Another tip: if your paper is being stubborn and won’t hold the curve, use a wooden skewer to run along the edge of each petal and roll it back slightly. Think of it like curling a ribbon. It softens the paper fibers and makes them bend where you want them to.
Assembling a Bouquet That Looks Like the Photo
If you’re making a bouquet, do yourself a favor and make five or six roses first. Don’t try to assemble one and then decide you hate it, it’s easier to fix spacing once you have a few finished pieces sitting in front of you.
For stems, you can glue the flat bottom right onto a skewer or a floral wire. But here’s a cleaner approach: poke a small hole in the central disc before you roll the spiral, then slide in your stem. The overlap of the petals hides the hole completely.
Now, about that pale blue background. There’s a reason so many spring craft photos use that weathered blue plank. It’s not just pretty, it makes the red pop like crazy. If you’re shooting your own craft photos, hunt down some faded blue paint or just use wrapping paper. You’ll look like a professional with zero effort.
Common Paper Rose Mistakes (and How to Fix Them)
If your first rose looks like a sad little blob, welcome to the club. It happens. Usually it’s one of three things.
Your spiral was too wide, making the rose look chunky and clumsy. Your scissors were dull, leaving rough, crushed edges. Or you rolled with too much tension and squeezed the petals into a tight unopened bud. All of these are fixable, and all of them get better with repetition.
The good news? Because these come together so fast, you can just start over. That’s the beauty of a quick project like this. There’s no sunk cost, no three hours spent on something that failed. Toss it, cut a new circle, try again.
I keep a little bowl of these on my desk, honestly. They survive pretty well for being made of paper. I have one that’s been sitting near my laptop for months, and it still looks fresh. Just keep them away from direct sunlight and humidity. A red rose with a water stain is not the aesthetic we’re going for.
Keep your spiral widths a little ragged on purpose. It gives the rose a looser, more romantic feel instead of a rigid store-bought look.
Pretty Ways to Use All Those Red Paper Roses
A bouquet on the dining table is the obvious choice, but let’s get a little more creative. You can glue a magnet to the back and stick one on your fridge. They make a fun gift topper instead of a bow, sized right at the center of a wrapped present.
If you’re planning a spring centerpiece, scatter a mix of red and pink roses down the middle of your table. They photograph beautifully against that light blue plank backdrop. That’s another thing, these roses look great in flat lay photos for cards or scrapbooks.
Making a bunch of small ones is excellent if you’re decorating for a baby shower or a birthday brunch. They’re light, cheap, and you can make a huge pile while you binge a show. Just don’t blame me if you end up making twenty of them. It’s genuinely kind of hard to stop once you get the hang of the spiral.
One last thought: try mixing in some smaller spirals in a deeper red or even a pale pink. A monochrome arrangement looks good, but a whisper of variation makes it feel designed.
Go cut some circles, roll a few spirals, and see what you come up with. I’d honestly love to see how yours turn out, especially if you hopped on that papercraft train for a spring project. Happy crafting, and enjoy the quiet meditative little snap while you roll one more petal.
Leave a Comment